Introduction
Until recently your only choice for developing applications for Apple’s iPhone was to jump into the Apple development ecosystem. This means being willing to write Objective-C code in the XCode IDE. For many developers, learning Objective-C was seen as a huge barrier-to-entry. This is especially true for many .NET developers whom have never had to worry about memory management, pointers, and other C language responsibilities that they are unfamiliar with.
All this has changed with the introduction the MonoTouch framework, a part of Novell’s Mono Project. The Mono Project is an open-source implementation of Microsoft .NET Platform. It allows you to run .NET applications on nearly any platform, including Apple, FreeBSD, Linux, Unix, and others. MonoTouch, which is a new part of the Mono Project, allows you to write applications using C# with .NET platform that run on the iPhone.
The intent of this article is to provide a solid introduction to the MonoTouch platform, where to find all the necessary pieces, the limitations of it, and how to build a basic application.
Background and Limitations
For .NET developers that want to develop for the iPhone, MonoTouch is great news. However, there are some limitations that one should be aware of before deciding to build their application, and for this, some background is needed.
How does it Work?
When building MonoTouch applications, most of the non-UI .NET 3.5 stack is either already available, or is in the roadmap to be included. This allows you to write applications using many of the .NET Framework Technologies that you’re already familiar with, including Windows Communication Framework (WCF), Workflow Foundation (WF), etc. It also includes nearly all of the Base Class Library (BCL) including things like Garbage Collection, Threading, Math Functions, System.Net, Cryptography, etc. For a list of available standard .NET assemblies see http://monotouch.net/Documentation/Assemblies. This is accomplished through a MonoTouch-specific set of base .NET libraries, similarly to how Silverlight and Moonlight work.
This means that you can compile standard .NET 3.5 code libraries using the MonoTouch core assemblies and use them in your application. So if, for example, you have a specialized library that does advanced math functions for engineering problems that you use for other applications, you can simply include the code library in your MonoTouch solution, and reference it. When you build your solution, it will compile it using the MonoTouch libraries, and it will then be available in your application.
MonoTouch also includes wrappers to the native iPhone APIs such as Location (GPS), the accelerometer, address book, etc. It also gives you the ability to bind to native Objective-C libraries that are not wrapped, so you can interop directly with existing Objective-C code.
How do I build a User-Interface (UI), Can I use Silverlight?
MonoTouch application UIs are built using the Apple’s Interface Builder (IB) application that ships with the iPhone SDK. Interface Builder uses Cocoa Touch (Apple’s UI Framework for iPhone) objects that are native to the iPhone. This means that you have all the standard iPhone controls available to your application, including Pickers, Sliders, Buttons, etc.
You can also create your interface programmatically, by instantiating Cocoa Touch objects and adding them to your applications Views (more on Views later).
You cannot, however, create your MonoTouch interface using traditional .NET technologies such as Silverlight, WPF, Winforms, etc.
Cocoa Touch uses a rough amalgamation of the Model View Controller (MVC) pattern that we’ll discuss in a later article. For now we will stick with a single screen.
How do I Distribute My Apps?
MonoTouch applications are distributed the exact same way that traditional iPhone applications are distributed, either via the Apple App Store, or Enterprise deployment.
The App Store is an online repository that allows users to pay for applications (if they’re not free), and download them. It is available from within iTunes, or directly from the iPhone itself. In order to get a license to distribute via the App Store, you must register with Apple, and pay $99/year.
Enterprise deployment is for those wishing to develop internal applications for a company, and distribute them to employees, etc., without listing them with the App Store.
What is the Licensing Model?
Unlike Mono, MonoTouch is not open source and is a commercial product. That means if you want to do anything useful with it you have to purchase a license. MonoTouch comes in three flavors and prices:
- Professional ($399) – A single personal developer license that allows you to develop applications and distribute them via the Apple App-Store.
- Enterprise ($999) – A single corporate developer license that allows you to develop applications and distribute via the App-store, or enterprise deployment.
- Enterprise, 5 Seat ($3,999) – The same as the Enterprise license, but includes 5 seats.
All three options include a year of free updates.
There is also an evaluation edition that allows you deploy to the simulator only. For the purposes of this introduction, that is all we’ll need.
What are the Limitations of MonoTouch?
No Just-in-Time Compilation
Per Apple’s iPhone policy, no application can include code that requires Just-in-Time (JIT) compilation. But wait a second, that’s exactly how .NET works, right? This is correct, however, the MonoTouch framework gets around this limitation by compiling your application down to a native iPhone assembly. This, however, introduces several limitations.
- Generics – Generics are instantiated by the JIT Compiler at run-time, however, Mono has an Ahead of Time (AOT) compilation mode that will generate all the methods and properties for things like List<T>. Other uses of Generics, such as Generic Virtual Methods, P/Invokes in Generic Types, and Value Types in Dictionary<TKey, TValue>, are not supported (although there is a workaround for Dictionary<TKey, TValue>).
- Dynamic Code Generation – Because dynamic code generation depends on the JIT Compiler, there is no support for any dynamic language compilation. This includes System.Reflection.Emit, Remoting, and the Dynamic Language Runtime.
C# Is the Only Language
Additionally, currently, the only .NET language available for writing MonoTouch applications is C#. Visual Basic.NET is slated for future releases of MonoTouch, but there is currently no time frame for when this will happen.
More Information
For a full list of limitations and more information, including workarounds, see http://monotouch.net/Documentation/Limitations.
Getting Started
In order to get started building MonoTouch applications for the iPhone we’ll need a few things:
- An Intel Mac Computer Running MacOSX 10.5 or 10.6 (Leopard or Snow Leopard)
- Apple’s iPhone SDK 3.0 or Higher
- The Current Version of Mono
- MonoTouch SDK
- An IDE such as MonoDevelop or XCode, or a Text Editor program
Mac with Leopard or Snow Leopard
This is an important and easily missed requirement. While, theoretically, you could build most of your application on other platforms, the iPhone Simulator and Interface Builder are only available for Leopard and Snow Leopard. Additionally, the compiler itself uses some low-level magic specific to the Intel Mac machines, so having one is an absolute must.
Apple’s iPhone SDK
Available at http://developer.apple.com/iphone/, the iPhone SDK is a free download, but you must register with Apple to get access to it. Along the way, Apple may ask you to pay $99 to get an iPhone Developer Account, which allows you to deploy your applications, but for the purposes of this tutorial, you just need the SDK. The iPhone SDK includes Interface Builder, the iPhone device simulator, XCode, and a few other things.
After you have installed the iPhone SDK, make sure you can launch the iPhone Simulator. To launch, open Spotlight and type iPhone Simulator.
Mono
Once you’ve tested out the iPhone Simulator, install the latest version of Mono for OSX. Mono can be downloaded from http://mono-project.com/Downloads. Make sure you click on the “intel” link, and not the CSDK. Also, install Mono before you install the MonoTouch SDK. Mono comes in a disk image, double click the Installer package and follow the instructions.
MonoTouch SDK
Next, download and install the latest MonoTouch SDK. You can either buy it at the MonoTouch store, http://monotouch.net/Store, and you’ll receive a link to download, or you can download an evaluation version from http://monotouch.net/DownloadTrial. If you purchase MonoTouch, you can deploy your applications to a properly setup iPhone, but in our case, we’ll just run it in the simulator, so the trial/evaluation version is fine for now.
Text Editor or Integrated Developer Environment (IDE)
If you want to create MonoTouch applications, all you need are the previous items and a text editor. You can create all your code files and manually compile using the command-line (terminal window). This would be quite a pain though, so we’re going to use an IDE to develop our applications in.
You can either modify/hack XCode (installed with the iPhone SDK) to use the MonoTouch libraries and compiler, or you can use MonoDevelop version for MonoTouch that already has all the configuration setup for MonoTouch applications. We’re going to use MonoDevelop, so go here, http://monodevelop.com/Download/Mac_MonoTouch and download it. To install MonoDevelop, drag the downloaded file to your applications directory.
If you have installed Mono correctly, MonoDevelop should open up without error.
Hello World Application
Now that we’ve gotten through all that, let’s actually build something.
MonoDevelop
First, launch MonoDevelop. You should see something similar to the following:

As a standard IDE, it should look pretty familiar. It’s very similar to Visual Studio, SharpDevelop, Visual C# Express, etc.
We’re going to create a new Solution to put our iPhone project in. Solutions are the exact same as they are in Visual Studio, and in fact, you can open up solutions you created in Visual Studio in MonoDevelop. One thing that is different in MonoDevelop though, is that you can actually have multiple solutions open in one instance of MonoDevelop, as illustrated in the following screen shot:

This is nice because in OSX you can’t have multiple instances of MonoDevelop (or any application, for that matter) open without annoying workarounds. So, if you need to switch between solutions (for example, if you want one open for sample code), you can simply open more than one at once.
So, with all that said, let’s create a new solution. In the menu, go to File : New : Solution:

We want to create an “iPhone MonoTouch Project” as shown in the following screenshot. Let’s go ahead and call it Example_HelloWorld_1.

Again, this is very similar to Visual Studio’s dialog for creating new solutions. Click Forward and on the next screen, just click OK, since we don’t need those features:

You should now have a solution view that looks something like this (note, I’ve expanded the arrows in the solution view to show all the files and references):

Let’s go through these:
- References – This folder contains our basic references needed for a MonoTouch application. The MonoTouch assembly includes everything needed that is specific to the iPhone, including all the wrappers to the Cocoa Touch controls and the core iPhone stuff such as Location, Data, etc. The System[.x] assemblies are the .NET Base Class Library and runtime that have been tailored to run on the iPhone.
- Main.cs – This is the same as it would be for a console application, a WPF application, etc. In here is our static void main() call, which serves an entry point for the application. We’ll take a look at this in more detail in a second.
- MainWindow.xib & MainWindow.xib.designer.cs – This is analogous to a Winforms Window, or a WPF Window. The xib file will actually be edited in Interface Builder, and the designer.cs file will hold our properties for that form.
Let’s examine the code in the Main.cs file:
using System;
using System.Collections.Generic;

using System.Linq;

using MonoTouch.Foundation;

using MonoTouch.UIKit;


namespace Example_HelloWorld_1

{

	public class Application

	{

		static void Main (string[] args)

		{

			UIApplication.Main (args);

		}

	}


	// The name AppDelegate is referenced in the MainWindow.xib file.

	public partial class AppDelegate : UIApplicationDelegate

	{

		// This method is invoked when the application has loaded its UI and its ready to run

		public override bool FinishedLaunching (UIApplication app, NSDictionary options)

		{

			// If you have defined a view, add it here:

			// window.AddSubview (navigationController.View);


			window.MakeKeyAndVisible ();


			return true;

		}


		// This method is required in iPhoneOS 3.0

		public override void OnActivated (UIApplication application)

		{

		}

	}
}
We have two interesting pieces here. We have our Application class and we have our AppDelegate class. This is where things start to get a little different from traditional .NET GUI development.
The way iPhone applications work is that your application class (derived from UIApplication) contains all your Windows, Views, Controls, Resources etc., and then you have an application delegate class (derived from UIApplicationDelegate) that handles callbacks from the iPhone OS that actually include your application lifecycle events (such as application launch and application termination) and significant runtime events (such as low-memory warnings).
By handling these events in your application delegate class, you have an opportunity to respond to them. For instance, when your application is shutting down, the WillTerminate() method is called on your application delegate, and you have an opportunity to save any user data, application state, etc.
In our Application class, we have a Main() method. By calling UIApplication.Main, the Objective-C runtime will look for your MainWindow.xib file (which contains the name of your UIApplicationDelegate class), instantiates your Application class (as a Singleton) and then starts calling lifecycle events on your AppDelegate class.
You don’t have to name your primary window (also known as the Main Interface File) “MainWindow.xib.” You can name it whatever you want but you have to tell the build system to look for whatever file you create. If you want it to look for a different file, open up the project options by right-clicking on your project file, click Options and then in Build : iPhone Application : Main Interface File, set that to whatever .xib file you want to be your primary window. The Objective-C runtime will then try to load that window when your application runs, and will find your application delegate from the setting in that file.
Additionally, you can name your application delegate class whatever you want. By default it is called “AppDelegate.” To change it, open your Main Interface File in Interface builder, and change the name of your Application Delegate [need to call out the clicks/names needed to perform]
We’ll come back to our Main.cs file in a bit, but first lets dig into the actual GUI of the application.
Interface Builder
So far we’ve seen a little bit of the code side of our iPhone application, lets dive into building the interface a bit. Apple’s application design toolset is called Interface Builder. Interface Builder is loosely coupled to your development environment. It edits the .xib files that define your application’s GUI. [NIB vs. XIB] Nib files contain an XML representation of your windows, controls, etc., similar to the XAML model in WPF/Silverlight.
Whether you write Objective-C in XCode, or C# in MonoDevelop, you still use Interface Builder the same way. This is possible because MonoDevelop listens for changes to the Nib files, and add/remove the appropriate code to the designer.cs files that map to the Nib files.
You can create your entire GUI programmatically, without ever having to open up Interface Builder, and in fact, some developers choose to do just that. There are many things that Interface Builder can’t even do, so at some point, you’re likely to wind up doing some things programmatically. Interface Builder hides some of that complexity though, so in the beginning, it’s easier to use Interface Builder to become familiar with some of the concepts of iPhone application GUIs.
So, with all that said, let’s fire it up. Double click on MainWindow.xib file. Interface Builder should launch and should see something like the following:

Lets look at these windows one by one. From left to right, these are, Document Window, the Design Surface Window, Library Window, and the Inspector Window.
Let’s look at the Document Window first:

This window shows all of the objects that are in .xib file. This is the default view, and while pretty, you’ll find it isn’t very useful, because your objects are actually arranged hierarchy and icon view only shows one level at a time. As we add controls to our window, they won’t show up in this view like this. So let’s change it to list view by clicking the center icon in the View Mode toolbar. It should now look something like this:

The next window is your design surface. This is where we’ll actually drag our Cocoa Touch controls onto to design our interface:

It is, of course, empty right now because we haven’t put any controls onto it.
Our next window is the Library. The Library contains all of the Cocoa Touch controls that we can use on our design surface. If you’re running Snow Leopard, your library window looks something like this:

And if you’re running Leopard, it should look something like this:

Notice that they are very similar. In Snow Leopard, there is a tab called “Classes,” that we’ll visit later, but that’s the only difference.
This is the default view of the library, but I like a slightly different view, so that I can see more controls at once. To change the view in your library window, right-click in the control view and you can choose between a few different styles. You can also click the Gear Button on the bottom left of the window. The following is the “icons and labels” style in Snow Leopard:

And in Leopard:

Our final window is the Inspector Window:

The inspector has four different views, accessible via the tab bar at the top of the window. These views are called Attribute Inspector, Connections Inspector, Size Inspector and Identity Inspector. The inspector is roughly analogous to the Property Explorer window in Visual Studio. It shows you all the properties of the currently selected Cocoa Touch object. With it you can set visual properties, layout, etc. It’s also necessary in order to create our Outlets and Actions, which we’ll talk about in a bit. In the picture above, we’ve selected the Window object in the Document window, so we’re looking at the attributes for that object.
Now that we have an overview of the Interface Builder windows, lets actually build something. Let’s create the following interface:

First, drag a “Round Rect Button” (UIButton) onto the window. Then, double-click on the button to set the text. You will notice as you do this, that you’ll start to get little guidelines. These guidelines are based on Apple’s Human Interface Guidelines and will help you to position your controls on your view with the appropriate spacing, etc.
After you’ve got your button on the window, drag a “Label” (UILabel) control. Resize the label so it takes up nearly the width of our window. Then, double-click the label and delete the text so that when the application starts, the label is blank.
If you’ve done everything correctly, your Document Window should look like the following (click on the arrow next to “Window” to see it’s child controls):

We’ve now created our first window interface. However, unlike traditional .NET GUI development, you cannot access your controls programmatically yet. If this were a WPF application for example, as soon as you drag a control onto the design surface, you can access it from it’s parent via this.ControlName. Right now, if you view the MainWindow.designer.cs file, you’ll see that it’s empty, except for a property for “window.” In order to make our objects accessible to our code-behind, we have to wire them up via Outlets. When you create an outlet in Interface Builder, MonoDevelop will add a matching property in the designer.cs file for that class, which then allows you to have programmatic access to the control.
Outlets
Lets add outlets for our label and our button, so that we can access them from our code-behind. This is where things are different in Leopard and Snow Leopard, so make sure to follow the correct instructions here.
[SNOW LEOPARD INSTRUCTIONS]
Make sure your Library Window is open. Click the “Classes” tab at the top. Click the first drop down, the one that says “Library,” and scroll all the way to the end and select “Other Classes.” This shows you the custom classes that exist in your project. Select AppDelegate from the top list, and then select the “Outlets” tab down below:

Click the “+” button, twice to create two new outlets.
[/SNOW LEOPARD INSTRUCTIONS]
[LEOPARD INSTRUCTIONS]
First, make sure that sure that in your Document Window, App Delegate is selected. If App Delegate isn’t selected, when you make your Outlets, the properties either won’t get created, or they’ll get created in the wrong place.
Next, let’s view the Identity Inspector. Identity Inspector is the last tab in the Inspector window. Now, locate the “Class Outlets” portion of the Identity Inspector. In Class Outlets, click the “+” button, twice to create two new outlets.
[/LEOPARD INSTRUCTIONS]
Each outlet has a name and a type. Name represents the name of the control property, and is analogous to ID in ASP.NET, or Name in WPF. Type is the actual type of the Outlet, such as a UIButton, UILabel, UITextView, etc. To name them, double click on their name and type in a name. For our outlets, we’re going to create “btnClickMe” and “lblResult.”
Right now, both of their types are “id.” If you leave the type as is, you can hook the outlet up to anything, because id means the type is dynamic, and is essentially “object” in the .NET world. The type of id is fine, but we’re going to give one of them an actual type. We’ll see what difference this makes in a second. For now, double-click the type of our btnClickMe and type in “UIButton” for the type. Your Class Outlets window should now look like this:

If you don’t have a window outlet in there, it means that you didn’t create your outlets on App Delegate. If that’s the case, delete the Outlets, make sure App Delegate is selected in the Document Window, and recreate the outlets.
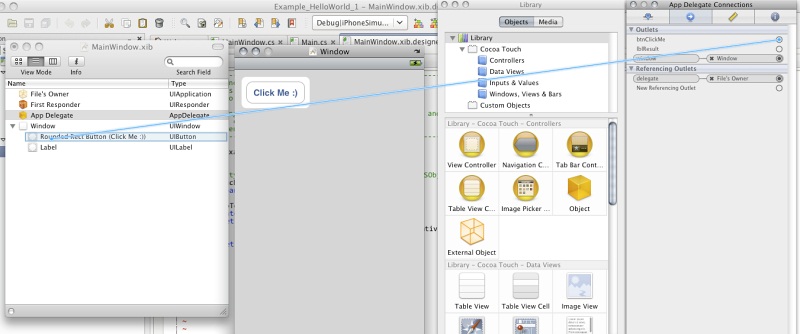
Now that we have these outlets created, we need to actually assign them to our controls. First, click on the second tab in the inspector window to bring up the Connections Inspector. In the Outlets section, we should now see the two new Outlets that we created. However, they’re not hooked up to anything. Notice that the “window” Outlet is hooked up to the “Window” object.
To hook up our Outlets, we need to drag from the circle next to the outlet in the “Outlets” section, over to the control we want to hook up. When we do this, we’ll get something like the following:

We need to do this to both Outlets. You can also drag from the Connections Inspector onto the Document Window. This is especially helpful if you have overlapping controls. This is illustrated in the following screen shot:

As we do this, you may notice something interesting. Because we gave lblResult a type of UILabel, when we drag the outlet to the Window, it will only allow a connection to be created if the object we’re dragging to is of that type, in this case, UILabel. btnClickMe, on the other hand, can be dragged onto anything, because it has the dynamic ID, type. This is one of the reasons that we strongly-type our outlets, so that it’s more difficult to accidentally hook them up to the wrong control. It’s not necessary, but it is a good practice to do so.
Ok, now that we have our interface created and our outlets hooked up, let’s head back over to MonoDevelop to wire everything up.
Back to MonoDevelop
If you open up MainWindow.designer.cs, you’ll now see two more properties in there:
[MonoTouch.Foundation.Connect("btnClickMe")]

private MonoTouch.UIKit.UIButton btnClickMe {

	get {

		return ((MonoTouch.UIKit.UIButton)(this.GetNativeField("btnClickMe")));

	}

	set {

		this.SetNativeField("btnClickMe", value);

	}

}


[MonoTouch.Foundation.Connect("lblResult")]

private MonoTouch.UIKit.UILabel lblResult {

	get {

		return ((MonoTouch.UIKit.UILabel)(this.GetNativeField("lblResult")));

	}

	set {

		this.SetNativeField("lblResult", value);

	}

}
These two properties now make our label and our button accessible via our code-behind. Notice an interesting thing here - even though we declared our btnClickMe as a type of id, the property that got created for it is strongly-typed as a UIButton. This is because MonoDevelop is smart enough to look at the actual underlying type of the outlet and create a property of the appropriate type. This is good for us, because it means we don’t have to cast the btnClickMe property to a UIButton every time we want to use it as one.
Let’s now go back to our Main.cs file, and look at the AppDelegate. Let’s look at the FinishedLaunching method:
// This method is invoked when the application has loaded its UI and its ready to run

public override bool FinishedLaunching (UIApplication app, NSDictionary options)

{

	// If you have defined a view, add it here:

	// window.AddSubview (navigationController.View);


	window.MakeKeyAndVisible ();


	return true;

}
As the comment suggests, this method is called by the Objective-C runtime after the Application is instantiated, and is ready to run. The first call (window.AddSubview) is commented out, and we’ll look into what that actually does a bit later when we talk about the Model View Controller (MVC) pattern.
The next call, window.MakeKeyAndVisible, sets the MainWindow to be the main window and actually makes it visible. In iPhone development, only part of this is actually interesting because you only ever have one, and only one window. If you want different “screens” on an iPhone app, you create new views, and have a view controller push them into the front. However, if you don’t call this method, the iPhone OS won’t send events to your window. So really, the MakeKey part makes sense, but the AndVisible part is really just vestigial from the traditional OSX Cocoa framework.
We’re going to add some new code to this file. When we created our outlets, we created them on the AppDelegate. That means that they’re now available in the AppDelegate class, so we’re going to access them from here. This is a little different from traditional .NET GUI programming, in that there we would usually have a MainWindow.cs file and handle all of the window code in there. In this case, We’re going to follow the Objective-C pattern and just put code in AppDelegate.
Let’s change our AppDelegate class to look like this:
// The name AppDelegate is referenced in the MainWindow.xib file.

public partial class AppDelegate : UIApplicationDelegate

{

	//---- number of times we've clicked

	protected int _numberOfClicks;


	// This method is invoked when the application has loaded its UI and its ready to run

	public override bool FinishedLaunching (UIApplication app, NSDictionary options)

	{

		// If you have defined a view, add it here:

		// window.AddSubview (navigationController.View);


		window.MakeKeyAndVisible ();


		//---- wire up our event handler

		this.btnClickMe.TouchDown += BtnClickMeTouchDown;


		return true;

	}


	protected void BtnClickMeTouchDown (object sender, EventArgs e)

	{

		//---- increment our counter

		this._numberOfClicks++;

		//---- update our label

		this.lblResult.Text = "Hello World, [" + this._numberOfClicks.ToString () + "] times";

	}


	// This method is required in iPhoneOS 3.0

	public override void OnActivated (UIApplication application)

	{

	}

}
The first thing we added is a variable to track the number of clicks, _numberOfClicks. Next, we added this line: this.btnClickMe.TouchDown += BtnClickMeTouchDown;
This wires up the TouchDown event (similar to OnClick) of btnClickMe to be handled by BtnClickMeTouchDown;
Then, in our BtnClickMeTouchDown, we simply updated our label with how many times our button has been clicked.
All right, now that we’ve done all this, let’s build and run the thing. Let’s build first. In the menu, select Build : Build All. If you’ve done everything correctly so far, it should build without errors. Next, let’s run it on the iPhone Simulator! In the toolbar, make sure that debug|iPhoneSimulator is selected and in the menu:

Next, select Run : Run. In the evaluation version of MonoTouch, you can only run on the simulator, if you try to run on your iPhone, you’ll get an error.
If everything goes right, the simulator should pop up (it may, in fact, hide behind your MonoDevelop window, so you might have to switch over to it), and you should see the following:

Clicking the button should result in something like:

Congratulations! You’ve just created and ran your first iPhone Application.
Actions
In our application we just created, we have outlets that are accessed via properties in our code. Just like in other .NET GUI paradigms, we can wire up event handlers to them and then respond to events. But MonoTouch offers another way to respond to user input. These are called Actions. Actions are similar to Commands in WPF, in that they allow multiple controls to invoke the same method, and then decide how you want to handle it, depending on who invoked it. Let’s look at this in little more detail. Make sure you have your Example_HelloWorld_1 application open in MonoDevelop.
Open up MainWindow.xib in Interface Builder by double-clicking the file. Now add two buttons below our label, similar to the following:

Again, this is wear instructions for Leopard and Snow Leopard diverge a bit, so make sure to follow the right ones.
[SNOW LEOPARD INSTRUCTIONS]
In the Library window, make sure you have the “Classes” tab selected, and the “Other Classes” selected again in the top drop-down. Then, select AppDelegate in the top part, and down below select the “Actions” tab. Create a new Action called ActionButtonClick. Your Library window should look something like the following:

[/SNOW LEOPARD INSTRUCTIONS]
[LEOPARD INSTRUCTIONS]
In the window explorer, make sure that App Delegate is selected. Then in the Identity Inspector window, under “Class Actions”, create a new Action called ActionButtonClick. Your Identity Inspector should look something like the following:

[/LEOPARD INSTRUCTIONS]
What we’ve just done is created a generic action on our App Delegate called ActionButtonClick. Now what we need to do is associate our buttons’ TouchDown events with it, so when they get clicked, our Action is called.
First, select one of our action buttons, then go to the Connections Inspector, and drag from Touch Down to our App Delegate in the Document window. It should look something like the following.

/filters:no_upscale()/articles/monotouch-introduction/en/resources/image1.png)
/filters:no_upscale()/articles/monotouch-introduction/en/resources/image7.png)
/filters:no_upscale()/articles/monotouch-introduction/en/resources/image11.png)
/filters:no_upscale()/articles/monotouch-introduction/en/resources/image13.png)
/filters:no_upscale()/articles/monotouch-introduction/en/resources/image15.png)
/filters:no_upscale()/articles/monotouch-introduction/en/resources/image20.png)
Notice when we drag to the App Delegate, it gives a list of possible Actions. Select ActionButtonClick, and now the TouchDown event on that button is associated with that action:

Do this for both of the action buttons. If we view the Connections Inspector for our App Delegate, it should now look like this:

I’ve expanded the associations on ActionButtonClick by clicking the arrow next to “Multiple.” Make sure to save your .xib file, and let’s go back to MonoDevelop.
If we look at MainWindow.designer.cs, we should see a new line of code:
[MonoTouch.Foundation.Export("ActionButtonClick")]

partial void ActionButtonClick (MonoTouch.UIKit.UIButton sender);
This is the partial declaration of our Action. Notice it’s decorated with the MonoTouch.Foundation.Export attribute. This allows the Objective-C runtime to find the appropriate method that is associated with our Action. The compiler actually ignores any partial method declarations that don’t have any implementation (as we see in this one), so really, this is here so that you get code completion when you go to implement it the method. If we go back to Main.cs, we’ll see this. In your AppDelegate class, notice that if you type “partial,” you’ll automatically get the autocompletion for our ActionButtonClick:

Let’s put the following code in there:
partial void ActionButtonClick (UIButton sender)

{

	//---- show which button was clicked

	this.lblResult.Text = sender.CurrentTitle + " Clicked";

}
Now, if we run the application, and click on the action buttons, we should see something like this:

At this point, we’ve gone through making a basic iPhone application using MonoTouch. You should now have a basic understanding of the structure of a MonoTouch application, handling user interaction with events, and also handling user interaction with Actions.
However, there’s one big thing missing, our application only has one screen. In our next article, The Model-View-Controller Pattern in MonoTouch, we will cover applications with multiple screens.